Woohoo! I've played 2 weeks in a row! This is for Taylored Expressions Challenge #51 (http://tayloredexpressions.blogspot.com/). I wanted to make a bright, happy card for a birthday!
The stamp is an old one from Hook's Lines & Inkers that I stamped with Stampin' Up Glorious Green and then I colored the image with Copics. I don't remember where I got the ribbon, but I don't think I had ever used it any of it. I used red line tape to attach the ribbon and finished it off with the little flower brads. The orange paper is from Basic Grey's Cupcake pack. The green is just some old paper I had around.
Sunday, January 18, 2009
Sunday, January 11, 2009
TECC #50
I spent a lot of time trying to find three small things that would go together for this card for Taylor's Cupcake Challenge - http://tayloredexpressions.blogspot.com/. I needed a birthday card for my cousin, so by adding a happy birthday to the inside, I am set....which is good as her b'day is tomorrow! Paper is from Black Market, Let it Bloom 6x6 pad. Large cupcake is from a Stampin Up set, "Birthday Best." I colored it with copics and used a combination of stickles and pick glitter for frosting. The small cupcake is from a clear set from Impression Obsession.
Sunday, January 4, 2009
CPS #97 Challenge
OOooops!! The week got by and I never got this one posted for the CPS http://cardpositioningsystems.blogspot.com/ challenge #97. So, I guess it's better late than never but I have to post it since I actually got the card made this time!
I used white prism cardstock for the base. Stamped the sentiment with a the justrite stamper from the wedding set and then embossed it. Punched it out and added a scalloped circle made with a spellbinder die. I attached it with foam tape to give it a bit of dimension. I added a gray rain drop to bring out the other circles. The pattern paper was some scraps I had and I'm not really sure where it came from. The ribbon came from Papertrey Ink I believe. This was a fun, easy card to make so I made a couple while I had everything out.
Thanks for looking!!
Saturday, January 3, 2009
Shrinky Dink Fun for Girls Night
Last night we had a "Girls Night" at a friends house and made cute little beverage markers with shrinky dinks. These are a few I made. They are not all totally completed but we ran out of wire for the rings last night so they can be finished later. It is so amazing how these things shrink up. We had a lot of fun with it!
Finally, another post!!
Hope you all had a great holiday time and are having a happy new year!! I haven't taken time to post anything lately. Even more recently, my main work computer has been down with a virus and that has totally messed up my work flow in my photography business!
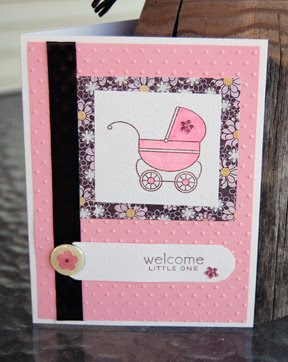
These are a few cards, and a bookmark, I put together recently. I love the baby card. The pink was embossed with swiss dots Cuttlebug embossing folder. I stamped the baby buggy with chocolate chip and colored it with copics and added a little bling. The patterned paper is from Basic Grey's Sugared (I love their 6x6 papers!) and the brad is from Making Memories. All the buggy and sentiment are from Bitty Baby Blessing from Papertrey Ink. This is such a cute set! The ribbon is just a brown satin ribbon...yeah, I know it looks black in the picture.
The bookmark was a just for fun project. The stamps are all from stampers anonymous. They are embossed then distressed with the Tim Holtz distressing inks and I also rubbed on a bit of stickles in a couple areas with my finger to add a bit of sparkle. I used my Crop-a-dile Big Bite to attach the eyelet. I totally love this thing...I used to had using eyelets but this truly makes it easy, plus the hole punch works great on most anything!
The final card is only partially finished as I couldn't decide what I wanted to put on it for a sentiment.....I decided to just wait and see what I might need this card for as it can be used many different ways. My motivation to make the card was simply to use this stamp and my doodlebug brown flocking on the cattails. The design was stamped with Versamark and embossed the Stampin Up copper, then colored with copics before applying the glue and adding the flocking. I loved how it turned out.
Thanks for checking in!!
Jo
Subscribe to:
Posts (Atom)